November 30, 2009 - 20:57 UTC - Tags: scrum kanban wii wiimote
If you are in an agile team (Scrum or Kanban) and the team is distributed, it might be hard to find a good solution for the agile board. The solution might be an electronic version. Why not build your own?
Why build an electronic agile board?
The standup meeting is an important tool for an agile team. During this meeting, the team members discuss the status for the tasks in progress and difficulties related to them. So it's important to have the board available and visible for the meeting.
In a distributed team, this might be hard to achieve. You want to have the board in a visible location in the room, so you can easily see status, but it's important that all members can see it. And because of this, the team members often end up duplicating the board into some web system.
By using an electronic agile board, this double work can be avoided. It also allow you can bring up the full description of a tasks during the standup, which makes it easier to discuss what to do. And you can even have the board tell you when it's time for the standup meeting.
An electronic agile board consists of a projector showing the web based system on a wall and either a smartboard or a homebuilt electronic whiteboard using a Wii controller and an IR pen.

The Wii controller and IR pen
(Photo: Fredrik Matheson)

The board in action
(Photo: Erlend Opdahl)
Building a wii controlled agile board
What do I need?
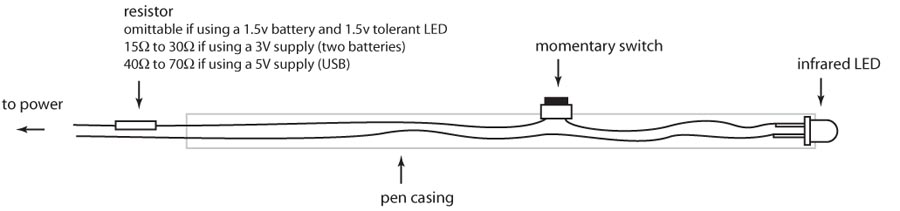
The IR pen
To build an IR pen you need an IR diode (i used a 940nm 100ma), a switch (for switching the diode on and off) and a 1.5 V AAA battery. The price was about $3, and I put everything in a normal whiteboard pen casing. Schematics for such a pen can be found here: Johnny Chung Lee – Pen schematics.
Connecting the Wii controller to the laptop
Download Wiimote Whiteboard from Johnny Chung Lee and unzip. There are some good guides for connecting the controller to the laptop on the Wiimote project page. The steps that works for my laptop:
Setup
Place the Wii-controller with the camera (the black part on the front) facing the wall or canvas. You might want to put it on the top of a shelve or similar in order to not block it when moving in front of the board. We experimented with taping it to a lamp which worked pretty well. After starting Wiimote Whiteboard, calibrate it by clicking the calibrate button and following the wizard. After the calibration, you can open the browser and start using the board.
Using the pen
The IR pen works as a mouse. Clicking the button somewhere on the board/canvas, is like clicking at the same location on the screen using the mouse. By holding the button, you can also drag and drop.
I've included a short video showing it in action:
Found some other videos as well:
Why build an electronic agile board?
The standup meeting is an important tool for an agile team. During this meeting, the team members discuss the status for the tasks in progress and difficulties related to them. So it's important to have the board available and visible for the meeting.
In a distributed team, this might be hard to achieve. You want to have the board in a visible location in the room, so you can easily see status, but it's important that all members can see it. And because of this, the team members often end up duplicating the board into some web system.
By using an electronic agile board, this double work can be avoided. It also allow you can bring up the full description of a tasks during the standup, which makes it easier to discuss what to do. And you can even have the board tell you when it's time for the standup meeting.
An electronic agile board consists of a projector showing the web based system on a wall and either a smartboard or a homebuilt electronic whiteboard using a Wii controller and an IR pen.

The Wii controller and IR pen
(Photo: Fredrik Matheson)

The board in action
(Photo: Erlend Opdahl)
Building a wii controlled agile board
What do I need?
- An agile board web UI supporting drag and drop (like Mingle or Scrumy)
- A projector
- Bluetooth on the laptop connected to the projector
- A Wii controller
- An IR pen
- Wiimote Whiteboard from Johnny Chung Lee
The IR pen
To build an IR pen you need an IR diode (i used a 940nm 100ma), a switch (for switching the diode on and off) and a 1.5 V AAA battery. The price was about $3, and I put everything in a normal whiteboard pen casing. Schematics for such a pen can be found here: Johnny Chung Lee – Pen schematics.
Connecting the Wii controller to the laptop
Download Wiimote Whiteboard from Johnny Chung Lee and unzip. There are some good guides for connecting the controller to the laptop on the Wiimote project page. The steps that works for my laptop:
- Hold button 1 and 2 on the wii controller (don't let go untill step 6)
- Click "Add new bluetooth device"
- When Windows has detected it, click "Next"
- When asked to enter the pairing code, click skip (if this option is not available you might need to downgrade(!) your bluetooth driver)
- Check the box and hit next
- Let go of the buttons on the controller
- Start Wiimote Whiteboard
Setup
Place the Wii-controller with the camera (the black part on the front) facing the wall or canvas. You might want to put it on the top of a shelve or similar in order to not block it when moving in front of the board. We experimented with taping it to a lamp which worked pretty well. After starting Wiimote Whiteboard, calibrate it by clicking the calibrate button and following the wizard. After the calibration, you can open the browser and start using the board.
Using the pen
The IR pen works as a mouse. Clicking the button somewhere on the board/canvas, is like clicking at the same location on the screen using the mouse. By holding the button, you can also drag and drop.
I've included a short video showing it in action:
Found some other videos as well:
May 11, 2010 - 22:35 UTC
aldo
pilo
Hy I want share with you Ardesia a program to be used with the wiimote whiteboardhttp://code.google.com/p/ardesia/
Ardesia enables you to make colored free-hand annotations on your computer screen, record it and share on the network.
This is especially useful when making presentations, to highlight things or point out things of interest.
The tool facilitates the online presentations and demos showing in real time your computer screen to anyone in the network.
Ardesia is XInput-Aware, so if you have a mouse, a graphic tablet, a touch screen, a wiimote whiteboard or a commercial whiteboard; you can draw lines with different strength, select color, erase things and draw arrows.
You can free-hand draw geometrical shapes using the shape recognizer, insert text with the keyboard and highlight screen areas. You can draw upon the desktop or select an image as background.
June 23, 2010 - 10:58 UTC


Ardesia 0.3 is out!
You can use the wiimote whiteboard with Ardesia
to annotate on the desktop
This is avaivable for Linux and Windows
http://code.google.com/p/ardesia/
You can see some screenshoot on
http://code.google.com/p/ardesia/wiki/Screenshot
You can use the wiimote whiteboard with Ardesia
to annotate on the desktop
This is avaivable for Linux and Windows
http://code.google.com/p/ardesia/
You can see some screenshoot on
http://code.google.com/p/ardesia/wiki/Screenshot
June 29, 2010 - 22:42 UTC


@aldo: Thanks. Looks good!
September 11, 2010 - 10:50 UTC
Ardesia 0.4 is out!
http://code.google.com/p/ardesia/
The new feature are pdf export and graphic tablet support, the recording and the streaming on icecast streaming server on windows are supported on windows also thanks to the vlc media player and streamer
...Ardesia is free and simple as you are; Try it now!
http://code.google.com/p/ardesia/
The new feature are pdf export and graphic tablet support, the recording and the streaming on icecast streaming server on windows are supported on windows also thanks to the vlc media player and streamer
...Ardesia is free and simple as you are; Try it now!
January 25, 2011 - 01:30 UTC
Now is out the newest release
April 1, 2011 - 11:52 UTC
Let's try the live distro for the wiimote whiteboard http://code.google.com/p/ardesia/wiki/Create_a_live_distro
April 10, 2011 - 13:00 UTC


You can also try www.agileboard.com. Kanban application for iPad
April 13, 2011 - 15:32 UTC
WiildOs 1.3.2 is out,
WiildOs is an educational live and installable GNU/Linux distro build
from the Ardesia stuff and thinking for teaching purposes. It includes
the software that enable you to use a wiimote whiteboard.
WiildOs includes lubuntu-desktop, python-whiteboard, ardesia, sankore,
spotlighter, curtain, florence-ramble, wmgui, wiican, easystroke,
whyteboard, vmg, shutter, gimp, tuxpaint, tuxmath, tuxtype, dia,
scribus, audacity, stellarium, xournal, gcompris, geogebra, wxmaxima,
openoffice.org, jokosher, musescore, solfege, stellarium, dasher,
eviacam and more!
More info on http://code.google.com/p/ardesia/wiki/WiildOs
Build a wiildOs4win wubi like installer that allow to install wiildOs
inside windows without partitioning the hard disk.
http://ardesia.googlecode.com/svn/wiki/wiildOs/wiildOs4win.exe
Changelog
- new kernel 2.6.35; this add the support to some new devices including
the toshiba bluettoth
- thunderbird in now the default mailer instead of sylpheed
- firefox is the default browser instead of chromium
- removed xscreensaver for performance issue
- remove all the gnome office suite; we use openoffice suite
- fix the wiican program; now you can you use the wiimote as controller
usinf the infrared camera or the accelerometers in a visual user
friendly way
August 21, 2011 - 21:12 UTC


It's great to come accross this blog. I am very much interested in wiimote project and education. Thank you so very much for this very informative blog article. Secondly I would like you if you please to indicate me how could I get a copy of WiildOs 1.3.2 (the list price, and the organization to contact. Last would like to make a suggestion; is it possible to use a digital pen featuring a capure camera to send the data to the PC to replace the couple wiimote plus ir pen.
thanks in advance for your cooperation
thanks in advance for your cooperation
August 21, 2011 - 21:16 UTC
Well may be I can offer my contribution by translating some of the files of the WiildOs project from english to french
About Erlend
Security guy with some thoughts on secure development.
Tag cloud
Categories
Blogroll
